Read More http://www.kevinandamanda.com/whatsnew/tutorials/how-to-use-a-cute-font-for-your-blogger-post-titles.html#ixzz1KYebDXd9

Tuesday, January 25, 2011

First Etsy Sale!

Yesterday was my birthday, which, in itself, makes the day great. But my day got just a little bit better when I received an e-mail from at Etsy shopper wanting to make a purchase!

Not only did she want to buy something from me, she wanted more than I was selling!

She is not someone I know, or know through someone - she just happened to come across my Etsy shop and wanted to buy from me. I can't tell you how happy that makes me!

I only made $12 off the sale, but that doesn't matter to me. I think deep down, my biggest fear about the shop is that no one would see it, and my items would just sit there.....

What a great birthday!!

Thursday, January 20, 2011

Breakfast Casserole


Easy Breakfast Casserole!

Recipe:

1 lb ground sausage
1/4 cup of chopped onion
2 1/2 cup of frozen cubed hash browns
5 large eggs
2 cups shredded cheddar cheese
1 3/4 cup milk
1 cup all purpose mix (ie: Bisquick)
1/4 teaspoon salt
1/4 teaspoon pepper


Ground the sausage - when the sausage is almost done cooking, add the onions.


Add the hasbrowns and cook until they are lightly browned.


In a bowl, mix your eggs, milk, cheese, all purpose mix, salt and pepper.

Grease a 9 x 13 glass Pyrex dish and spread your meat mixture in the pan.

Pour the wet mixture in the Pyrex dish. Cover with aluminum foil.


***You will need to refrigerate this for 8 hours before you cook it in the oven***
I didn't know this the first time I cooked it... so I had to get up early the next morning to finish making it!!! Coffee was good that morning!!!!


Cook it in a 350 degree oven for 45 mins covered with the aluminum foil. Then remove the foil and continue cooking for 10 - 15 mins (or until a toothpick stuck in the middle comes out clean).

Enjoy!

Pot Roast

Last night, I made Pot Roast for the first time.... well not sure you can call it pot roast cause I cooked it in the oven... but either way, I cooked a really good, easy meal!!

Here's the recipe:
2.5 lb Boneless Roast Chuck
1 package of Lipton Onion Soup Mix
6 Small Potatoes
6 Carrots
1/3 Cup of A.1. Sauce
1/3 Cup of Water
1/2 of an Onion


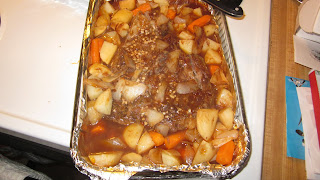
NOTE: *The recipe called for an aluminum pan, but I used a glass Pyrex dish and lined it with aluminum. I would not do this again in the future because when I tried to scoop out the food and juice when it was done cooking, I had to be careful not to rip the foil. I would just put it in the glass pan. - Just ignore the foil in the pictures!*

Put the meat in the dish - I poked it several times on each side with a fork.


In a bowl, mix together the A.1. Sauce,


the Soup Mix and water.


Cut up the veggies into small 1 - 2 inches pieces and spread them around the meat. Pour the wet mixture over the food.


I decided to add minced garlic at the last minute....


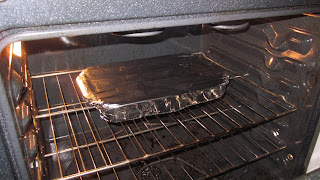
Cover the pan with aluminum foil and cook in a 350 degree preheated oven for 2 hours.


Viola!


I cooked rice to go along with the dinner!


Patiently Waiting......

So my Birthday is Next Monday. and I have a rule - because my birthday is so close to Christmas, I won't allow myself to buy anything because I can ask for it for my birthday. Plus, If I bought myself stuff that I want, then my family won't know what to get me for my birthday.

This year, I have have been patiently waiting for several items that will allow me to create stuff for my Etsy store. Until my birthday, my Etsy store will be sitting pretty empty..... just waiting....

4 more days.....!

Friday, January 14, 2011

Framed Tile Art

This project started quite a long time ago... and I finally got around to finishing it the other day!
(and because I started it a long time ago, I don't have pictures of the first few steps..... sorry!)

Materials needed:
A large image printed on glossy paper
Tiles
Wood to attach the tiles to
Trim (used to create the frame)
Glue or Mod Podge
Adhesive
Paint
Nails/Screws
Grout (or silicon)

I first started with an image that I found online. I took it to Kinko's and had them enlarge the photo, then printed it off on glossy paper - try to get the cheapest type of paper they have!!

(FYI on enlarging your print - first figure out the measurements of your tiles. Kinko's will try to make the print the same size, cropping where needed.)

I then cut the print into 6 equal squares (my tiles are 6" x 6")

Using Mod Podge, I glued the squares on the tiles - try not to have any air bubbles!

Here's what it looked like at the point:


Using my new handy dandy Christmas gift (a Compound miter saw!) I cut the trim pieces down to size and on a 45 degree angle.


(ignore the extra pieces of trim pieces - This is why the project stopped last time - I had cut the trim pieces too short!)

Because it was SSSSOOOOO cold that night, my husband suggested we bring the nail gun (connected to a compressor!) in the house. (Redneck style!)

Yes please! Anything to get out of the cold!

This is how we attached the trim to the back piece of wood.


I then painted the trim with a blue paint (and a little bit of white paint), then sanded it to give it the distressed, beachy look.

Be sure to paint your wood before you attach your tiles!


I used liquid nail to attach the tiles.

Here's how it looked before grouting between the tile.


In the past, I have used a clear silicon which turns out well. For this project, I decided to try grout. What I found was this tube of caulk at Home Depot. It looks and acts just like grout - many colors to choose from, and you can choose between sanded and non-sanded versions.


Once you squeeze the caulk in the seams, you have to wipe it down with a wet finger to clean up the extra.


Here is the final look. Only thing left to do is attach a hanger to it, and hang it on the wall!
(FYI - it will be heavy, so make sure you use a good hanger and attach it to a stud in the wall!)

I think I may use my cricut and cut from black vinyl 'The Big Red' and put it in the white space above the fish.... hhhmmmm.....

Thursday, January 13, 2011

Post Wedding Stuff

Yesterday, Mike and I both took 1/2 days off at work to wrap up post wedding stuff. Insurance stuff, banking stuff, etc.... I will be glad when EVERYTHING is done! We still have a few more things to do, but there is light at then end of the tunnel!

Another thing that is taking forever to finish is changing my last name. I have dropped 'Dale' and taken on 'Collins'. I made a list of what companies to call to make the change, but I'm still not done. Example: I went to pick up a prescription the other day and realized that I had not made the change there. I was told that I needed to contact my health insurance company first - Making that call never once entered in my mind! What else is out there?!?! I guess I will find out as time goes on.

Slowly but surely, this will all come to an end. (Hopefully soon!)

Monday, January 10, 2011

Etsy Shop!

It's official - I have an Etsy shop that is up (not quite running yet!)

Here's the link: http://www.etsy.com/shop/harleyboydesigns

As you can see, there is nothing for sale, but I'm busy coming up with ideas and making items!